Sunday, May 4, 2014

Chromecast Development Tutorial - Hello World

This guide is being moved to: http://chromecasthub.com/developers/

Please visit the site for complete tutorials and more resources for Chromecast programming!


Note: This is part of a multi-part series on developing web applications that integrate Google's Chromecast SDK. I am working on making a complete resource for web development with the Chromecast, so consider this a pre-release version and please comment if you see any issues or have recommendations on how to improve the tutorial.
Part 1 - Introduction
Part 2 - Getting Started
Part 3 - Hello World
Part 4 - Your Own First App


3 Hello World
The first program in a new language is almost always the “Hello World” program. For that reason, we are going to be using Google’s demo app called “CastHelloVideo” to get our first app up and running. To begin, log into your development server and clone the GitHub repository located at: https://github.com/googlecast/CastHelloVideo-chrome.

user@test:~$git clone https://github.com/googlecast/CastHelloVideo-chrome

Move the folder into your /var/www directory so that you can access it via your IP address (or domain if you have configured one).
At this point, you should be able to point your browser at your IP address and see your “CastHelloVideo-chrome” folder.
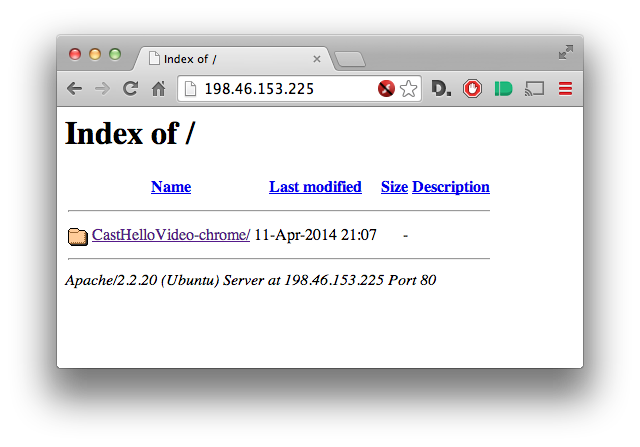
Screen Shot 2014-04-29 at 11.49.15 PM.png
Figure 3-1 - HelloWorld Running

Click into the folder and you should see the application. Play around for a bit and ensure that you can connect to your Chromecast and successfully cast a video. In the coming chapters, we will be building an application from the ground up that will have similar features, but for now, you can look at the source code or simply understand the various controls.

Continue on to Part 4 Here

Chromecast Development Tutorial - Getting Started

This guide is being moved to: http://chromecasthub.com/developers/
Please visit the site for complete tutorials and more resources for Chromecast programming!

Note: This is part of a multi-part series on developing web applications that integrate Google's Chromecast SDK. I am working on making a complete resource for web development with the Chromecast, so consider this a pre-release version and please comment if you see any issues or have recommendations on how to improve the tutorial.
Part 1 - Introduction
Part 2 - Getting Started
Part 3 - Hello World
Part 4 - Your Own First App


2 Getting Started


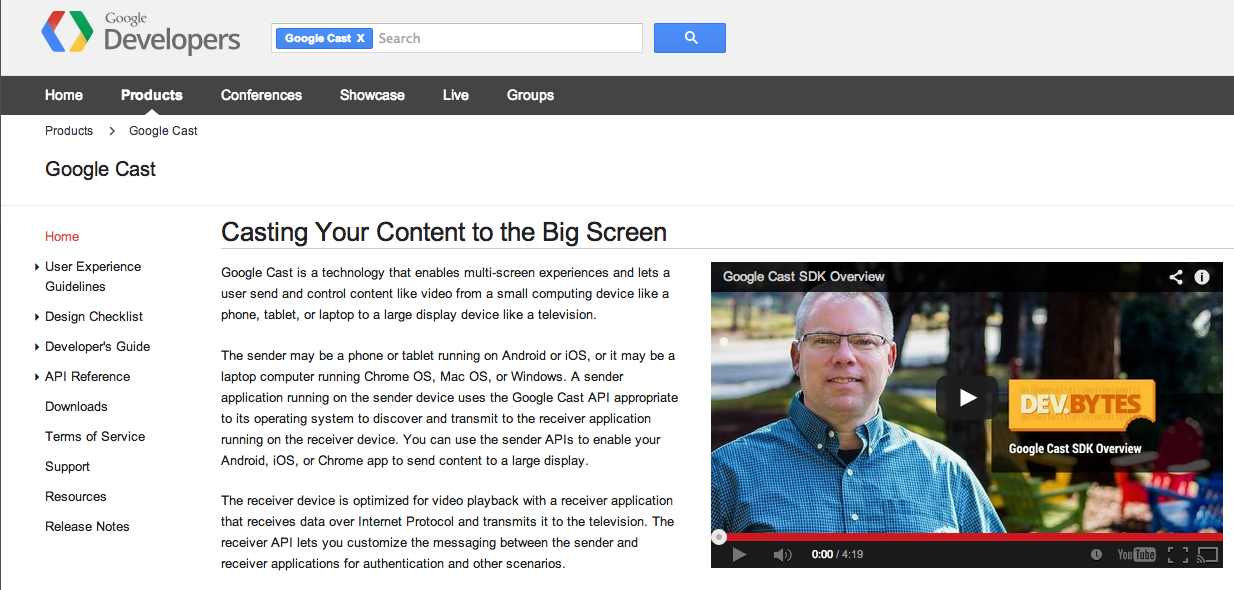
The first and foremost place to begin is the official Google Chromecast Developer’s site (https://developers.google.com/cast/).


Screen Shot 2014-04-24 at 12.01.39 AM.png

Figure 2-1 - The Chromecast Developer’s Homepage
If you’re reading this guide, it’s very likely that you have been to this site and left frustrated, exactly as I did. While the Chromecast is an excellent device, its documentation is unfortunately lacking. In the next few pages, I will be walking through the various steps required to begin working on developing a web application integrated with Chromecast.

Development Environment

I’m sure you already have a favorite text editor or programming environment setup. But if not, this is the part where you will want to download something more than just Notepad. Here are a few recommendations:
  • Sublime Text: Free “Development Edition”, Mac, Windows, Linux  http://www.sublimetext.com/
  • Komodo Edit: Free, Mac, Windows, Linux http://www.activestate.com/komodo-edit/downloads

There are thousands of editors, but you’ll only need one with HTML and JavaScript support (unless you plan to make a more functional website with Python, PHP, Ruby, etc.). Once you have installed your editor, you can begin writing code.

Server Environment

Personally, I develop locally on my machine before deploying to a virtual server hosted through a provider such as Amazon, DigitalOcean, Linode, or one of many others. When developing for the Chromecast, you will need to have a web server reachable via the Internet. This is because the Chromecast communicates with server directly rather than over the local WiFi connection. For example, when you cast a YouTube video, Google is receiving the instructions for casting, pausing, playing, etc. via YouTube.com

If you want your own dedicated IP address and server, the quickest and simplest method of getting a server online is through DigitalOcean (http://digitalocean.com). Their simplest plans cost only $5 at the time of publishing and have enough resources to host basic websites. Alternatively, you can use GitHub Pages (https://pages.github.com) for hosting of HTML, CSS, JavaScript, and media files. The prior link explains how to setup GitHub pages, so I will not walk through every step of that process. In this book, I will be using a standard Ubuntu Server with a dedicated public IP address.

If you choose to use a standalone server, ensure that Apache or some other web server alternative is setup (such as nginx). I will not be walking through this process, as setting up Apache is one of the most popular how-to guides on the Internet.

Additionally, you can host everything needed for your website on Google Drive (as long as it is a simple HTML application and doesn't use PHP, Node.JS, or another sever-side code base). Here is a video explaining how to host website on Google Drive (the easiest method):


Configuring the Chromecast

By default, the Chromecast is not setup for development. To enable development, you have to change a setting within the Chromecast Desktop App. You used this app when you first setup the Chromecast, but if you’ve deleted it since, you can redownload it at: https://cast.google.com/chromecast/setup/

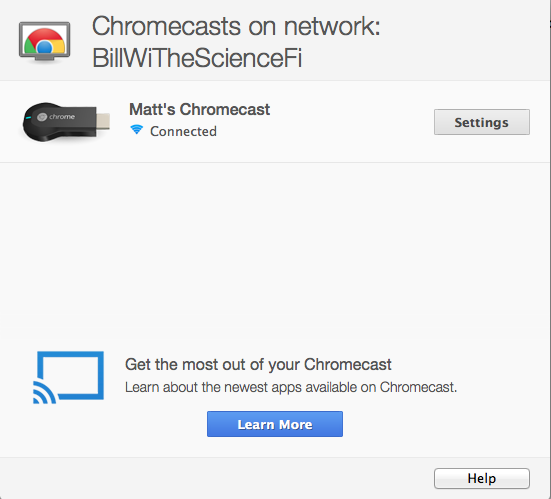
Once you’ve installed the Chromecast application and ensured your device is online, click on the “Settings” button within the app.

Screen Shot 2014-04-24 at 12.26.14 AM.png
Figure 2-2 - Desktop Chromecast App

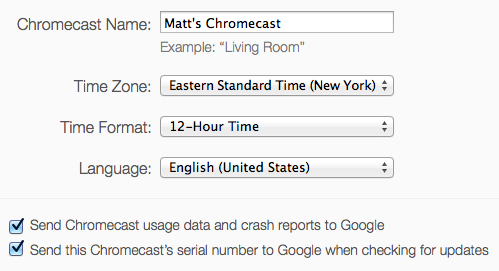
At the bottom of the settings page, check the box labeled “Send this Chromecast’s serial number to Google when checking for updates” and then reboot the Chromecast.

Screen Shot 2014-04-24 at 12.27.54 AM.png
Figure 2-3 - Chromecast Development Settings
Once the Chromecast is configured, ensure that you have the Chrome Chromecast Extension installed. It should appear at the top right of your browser, and clicking it should enable casting of the current tab or media if it is a supported page such as YouTube.

Developer Tools

Once you have enabled the checkboxes above and rebooted, you will have access to the developer tools of the Chromecast device. These tools look very similar to the standard Chrome developer tools and will become helpful later when developing receiver applications, so you may wish to check that you can access them now and familiarize yourself with them. They are located on port 9222 of the Chromecast. Find the Chromecast’s IP address via the application used previously (under “Settings”) and then access the tools via the browser at http://<ip-address>:9222.

You are now ready to begin Chromecast development! There are a few more “Setup” steps that I will discuss later, but they are not required to begin. In the next section, we will walk through downloading and running a demo app provided by Google so that you can understand how the Chromecast SDK is integrated into a website.

Chromecast Development Tutorial - Introduction

This guide is being moved to: http://chromecasthub.com/developers/
Please visit the site for complete tutorials and more resources for Chromecast programming!

Note: This is part of a multi-part series on developing web applications that integrate Google's Chromecast SDK. I am working on making a complete resource for web development with the Chromecast, so consider this a pre-release version and please comment if you see any issues or have recommendations on how to improve the tutorial.
Part 1 - Introduction
Part 2 - Getting Started
Part 3 - Hello World
Part 4 - Your Own First App

1 Introduction


On July 24th, 2013, Google released a small, thumb-drive sized HDMI device that quickly leapt to the top-seller charts on Amazon and many other shopping sites. The device, a $35 piece of hardware, was designed to bring the world of online streaming media to the television. The Chromecast solved the issue of using an HDMI cable from a laptop connected to a television simply to watch YouTube and other videos.
At first, the device was relatively limited, only supporting playback via Netflix as well as various Google properties such as YouTube and Google Play Music. Support for “casting” a tab through Chrome, as well as the entire desktop through a plugin, was added, but many users reported poor performance. This stemmed from the fact that, when a supported site (such as YouTube) was cast, the Chromecast played the file directly; yet when the tab itself was cast, the user’s computer acted as a web server, streaming the content to the device.

Despite working natively with YouTube, Netflix, and a small handful of other sites, the Chromecast did not work easily with other sites with video. This often led to sluggish performance as users attempted to cast a Flash video playing on a website to the Chromecast via the “Cast Tab” feature. A number of Android apps were developed that attempted to fix casting issues, but none were supported by Google and they broke often as the underlying APIs changed.

After several months, Google finally released an officially supported API to allow developers to integrate casting into their websites directly. Now, users of the site could cast the content directly to the device, bypassing the “Cast Tab” requirements. Additionally, Android and iOS SDKs were released to allow developers the ability to integrate Chromecast support directly into their applications.

Google has released a web, Android, and iOS SDK to allow direct communication with the Chromecast. This guide focuses solely on web development for the Chromecast. I do not have enough Android or iOS development experience to make a practical guide for those platforms, but hopefully some of the techniques provided here can be used interchangeably.

This guide contains a wealth of code samples and demonstrations that will hopefully ease the development process for integrating Chromecast onto your website. However, I assume that you have some experience with web development and are fairly comfortable with HTML and JavaScript. I have written this book because the documentation provided by Google is very basic and sometimes woefully incomplete. This guide is structured so that you can read it from beginning to end or skip to an applicable section. I cannot guarantee that the samples and explanations provided within will be accurate forever, as Google frequently changes the structure and functionality of their APIs. Now that the disclaimers are out of the way, let’s begin programming for the Chromecast!

Thursday, May 1, 2014

Creating Multiple Opsview Pager Duty Services

Pager Duty, the popular alerting system for sysadmins, provides easy integration with a wide variety of tools. Recently, I have been using Opsview, a fork of Nagios, for system monitoring. Integrating Opsview with Pager Duty is fairly simple when creating a "catch all" user that sends every alert to Pager Duty. However, creating fine-tuned alerts associated with different Pager Duty services is a bit more complex.


The following steps should be completed for every service that requires a Pager Duty integration:


  1. Within Pager Duty, click the "Services" tab and then click "Add New Service."


  2. Provide a name for the service, select an escalation policy, and then choose "Opsview" in the "Integration" menu.


  3. On the next page, copy your Service API Key
  4. At this point, you need to prepare Opsview for Pager Duty integration if you haven't done so already. I am not going to repeat these steps because Pager Duty has an excellent guide here. Follow the steps under "On Your Server" and "In Opsview" up to step 13.
  5. When you create a new user in Opsview, give it a unique name for the service. In this case, I am using "Pager Duty - Flickr".
  6. The role should be Administrator and the password should be something long, complex, and not easily guessable. You will never need it again, so feel free to make it 100 characters.
  7. Click Next
  8. In the "Pagerduty Service Key" box, enter the key you copied in step 3
  9. Submit the changes and you should now see your user listed
  10. Now, click on "No Notifications Configured" next to your user to be taken to the notifications page
  11. On this page, enter a name, check the box to notify by Pagerduty, and select all of the host groups and services related to that service only
  12. Edit the other defaults as needed, then submit the changes
  13. Be sure to reload Opsview so your changes take effect
  14. Now, you can repeat this process of creating a new user for each service you want to monitor separately

Monday, April 28, 2014

CURL POST JSON Data from a File

Sometimes I need to POST JSON data to an API endpoint for testing that is too large to fit easily on the command line in the typical "{"id":1,"string":"something"}" format. Instead, it is much easier to just save the entire JSON structure to a file and then reference that file in the CURL.

For example, with the JSON data saved to temp.json:

curl -X POST -H 'content-type: application/json' -d @temp.json http://dev.com/api/

It's as simple as that!

Tuesday, April 8, 2014

How to Fix OpenSSL Heart Bleed Bug on Amazon ELBs

The recently discovered "Heart Bleed" bug in OpenSSL is an extremely critical security issue. Amazon has been working to get all of their environments patched to the latest version of OpenSSL that remedies the issue.

If you have Elastic Load Balancers currently using an SSL certificate that was generated via OpenSSL version 1.1.0a-f, you need to follow these streps to revoke the current certificate on your load balancer and upload a new one.

First, update OpenSSL on the machine you are going to use to generate your private key and sign your certificate. I have written another post on how to do that here: http://blog.matthewdfuller.com/2014/04/how-to-fix-openssl-heart-bleed-bug-on.html

Once you have regenerated your keys and resigned your certificate, you can upload them to your load balancers.

Within the AWS console, click "EC2" in the Services menu.


Now, click on "Load Balancers" on the left-hand side and select your load balancer instance.

Click on the "Listeners" tab and notice the existing cert:


Click "Change" and then click "Upload a new cert."

Give your cert a name, paste in the private key and cert you created earlier, and provide any chain information if needed.

Hit save and your load balancer will push the changes.

If you want to do this via the command line or API, check out the official AWS documentation: http://docs.aws.amazon.com/ElasticLoadBalancing/latest/DeveloperGuide/US_UpdatingLoadBalancerSSL.html

How to Fix OpenSSL Heart Bleed Bug on Ubuntu

If you're looking for how to update your Amazon Elastic Load Balancer, click here instead.

The recently discovered "Heart Bleed" bug in OpenSSL is an extremely critical security issue. Fixing it is relatively simple now that Ubuntu has pushed out changes to their repositories containing a fixed version of OpenSSL.

The following steps need to be run on each server that you generated a certificate or private key on. If you are using one certificate on multiple servers, then the cert needs to be revoked and regenerated on one of them and then pushed to each of the other servers.

UPDATE: Thanks to anonymous commenter for pointing out that relying solely on the build information is not completely accurate. Versions earlier than 1.0.1 are not vulnerable (although you should upgrade now that a fix is live for the latest version).

First, to make sure you (for some reason) don't have the latest version, run the following commands:

openssl version -b

openssl version -a

The response will look like:

OpenSSL 1.0.1 14 Mar 2012

built on: Wed Jan  8 20:45:51 UTC 2014

If the date is not more recent than older than "Mon Apr  7 20:33:29 UTC 2014" and the version is 1.0.1, then you are vulnerable to the Heart Bleed bug.

UPDATE: Reworded the above to make it clearer that the vulnerable versions were built before April 7th.

UPDATE: As James points out in the comments, different versions may have been built at different times, thus you should rely only on the date, not the time. Anything before Apr 7 is considered vulnerable.

Next, update your repositories:

sudo apt-get update

Once this finishes, upgrade openssl:

sudo apt-get upgrade openssl

sudo apt-get install openssl libssl1.0.0

UPDATE: use the install command to upgrade only openssl and libssl rather than upgrading everything on the server.

Once the upgrade finishes, check the version again. It should now read "Apr 7" or later.

Now, you need to regenerate your certificate using a new private key. This process is the same as it as always been, but I am including the link here for posterity's sake:

(Use step 3 and replace the key and cert names with your existing ones to overwrite them).

Once finished, you need to restart your Apache server and any services using SSL.

Update: Now with video: